Sales and CS teams have limited time and resources. Dozens of buying signals and buying triggers happen every day, and they don’t have time to figure out which ones matter most.
Automating the process from buying signal to action is a core differentiator of UserGems. This signal-based GTM philosophy will help with pipeline generation and hitting revenue targets without wasted effort. And you’ll be thankful opportunities stop slipping through the cracks!
Follow these steps to set up your own filters and automations!
{{dig-deeper-cta-1}}
First, set your program up for automation the right way
There is some pre-work that needs to be done before you can set up automations. These are the four tasks you need to complete before you can truly begin creating signal-based workflows.
- Upload report of Target Accounts - This will help differentiate between high-priority and other prospect accounts.
- Define buyer persona - Give your best personas the most attention and the right treatment.
- Define ICP (Countries, Company Size) - If you don’t have target accounts, this is a great way to ensure you’re capturing all relevant accounts, but even if you do have target accounts this is a great way to make sure you’re not missing any potentially good fit customers.
- Define DRIs (Directly Responsible Individuals)—The person responsible for action will change based on the scenario. You might want your SDRs alerted when a Champion joins a new account. If the Champion leaves an account, the CSM should be notified to avoid churn.
Once this pre-work is complete, it’s time to start automating!
Setting up automated workflows in UserGems
Before we start, note that UserGems allows for both manual control and full automation of signal-based workflows. Either way, you have to establish filters first.
How to use existing & custom filters
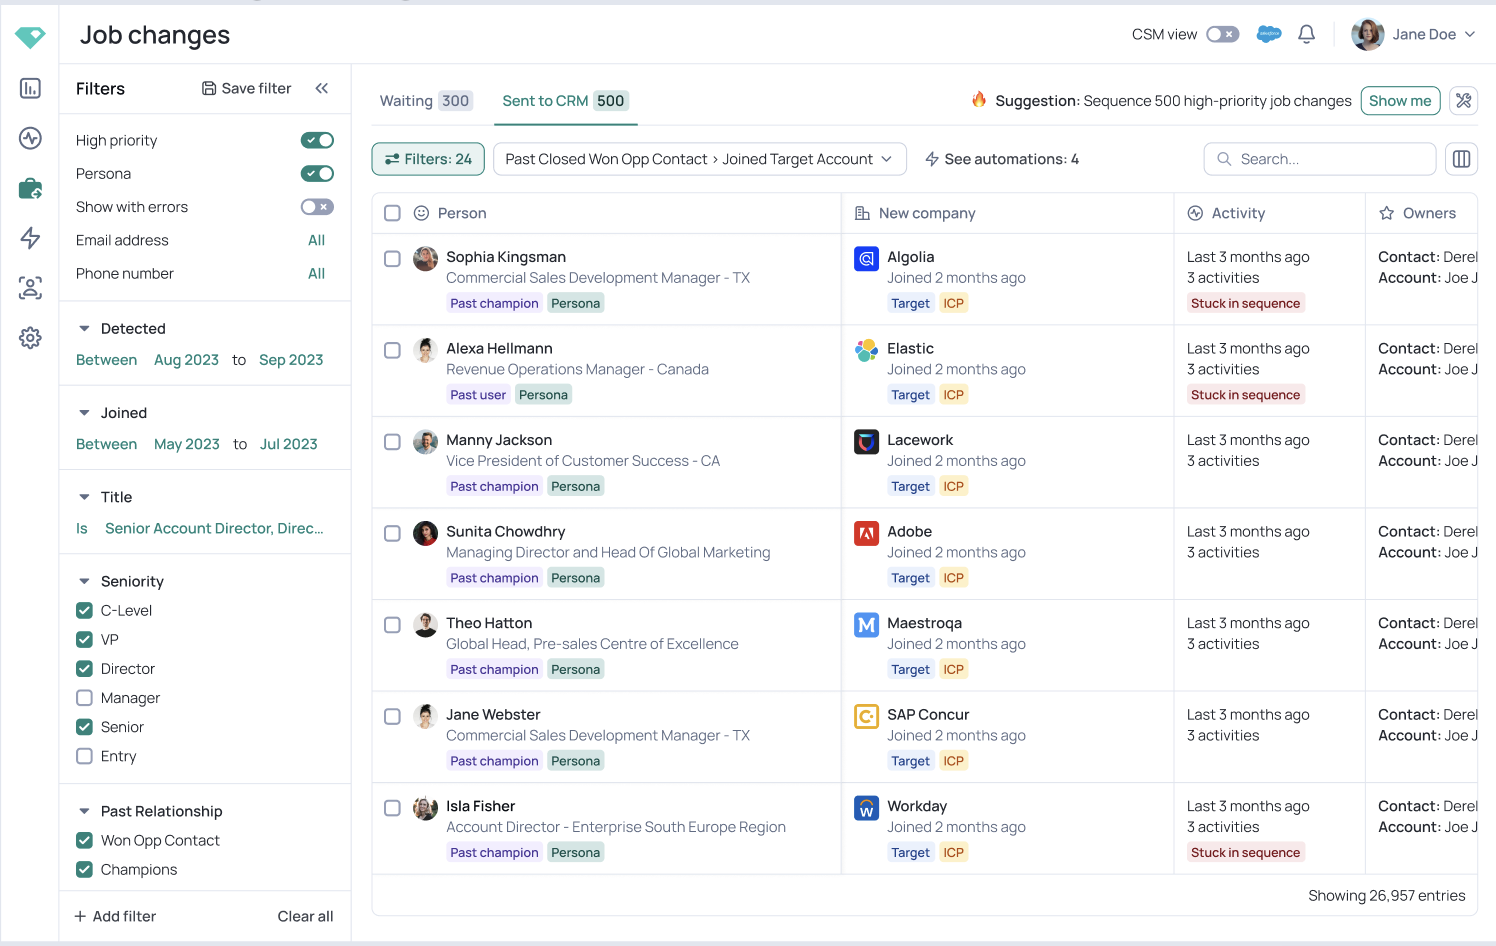
Navigate to the Job Changes section of UserGems to use custom or pre-defined filters. Our pre-built filters capture some of the most common job change scenarios. For example:
- Past customer recently joined new account
- Past prospect recently joined a new account
- Uncontacted high-priority UserGems
To make a custom filter, start by choosing a prebuilt filter to use as a base. Navigate to the left of the dashboard and adjust filtering options. Configure your filter based on anything found in the UserGems object, such as:
- Persona
- Priority
- Date range
- Activity types
- Past relationship
- Account joined
💡Pro Tip: Make sure your filter is set to “Current Email is Not Empty” if you’re planning to add these prospects to an email sequence. This will prevent it from failing.
How to add automatic workflows to reduce manual signal tracking
Are you missing your best leads because of manual processes?
In this next section, we'll walk through 2 example workflows to help get you started. Follow along to start setting up workflows in minutes!
Workflow #1 - New Hires at Target Account
What does your team do when a new hire joins a target account?
Typically, someone tracking this signal would need to alert the sales rep via Slack and add the contact to an outbound sequence. Setting up a sales trigger workflow eliminates these manual steps.
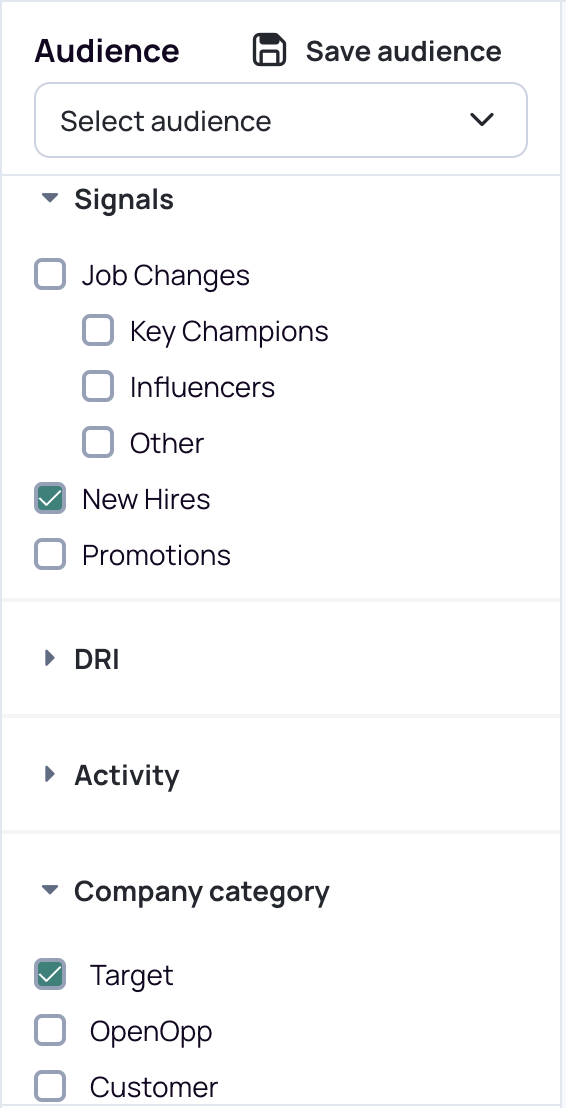
Create an Audience
Step 1. The first step in setting up any workflow is to create an audience. Creating an audience tells UserGems who should be included in the automation.
To do this, navigate to the Account Tracking tab and select Prospects from the left-hand navigation bar.
You’ll see multiple dropdown options to filter your audience. Check the following options:
- Company Category - Target
- Persona
- Has Email - Yes
- Signal - New Hires
- All Accounts
Now click “Save audience” and name it something you will remember.
Create the Workflow
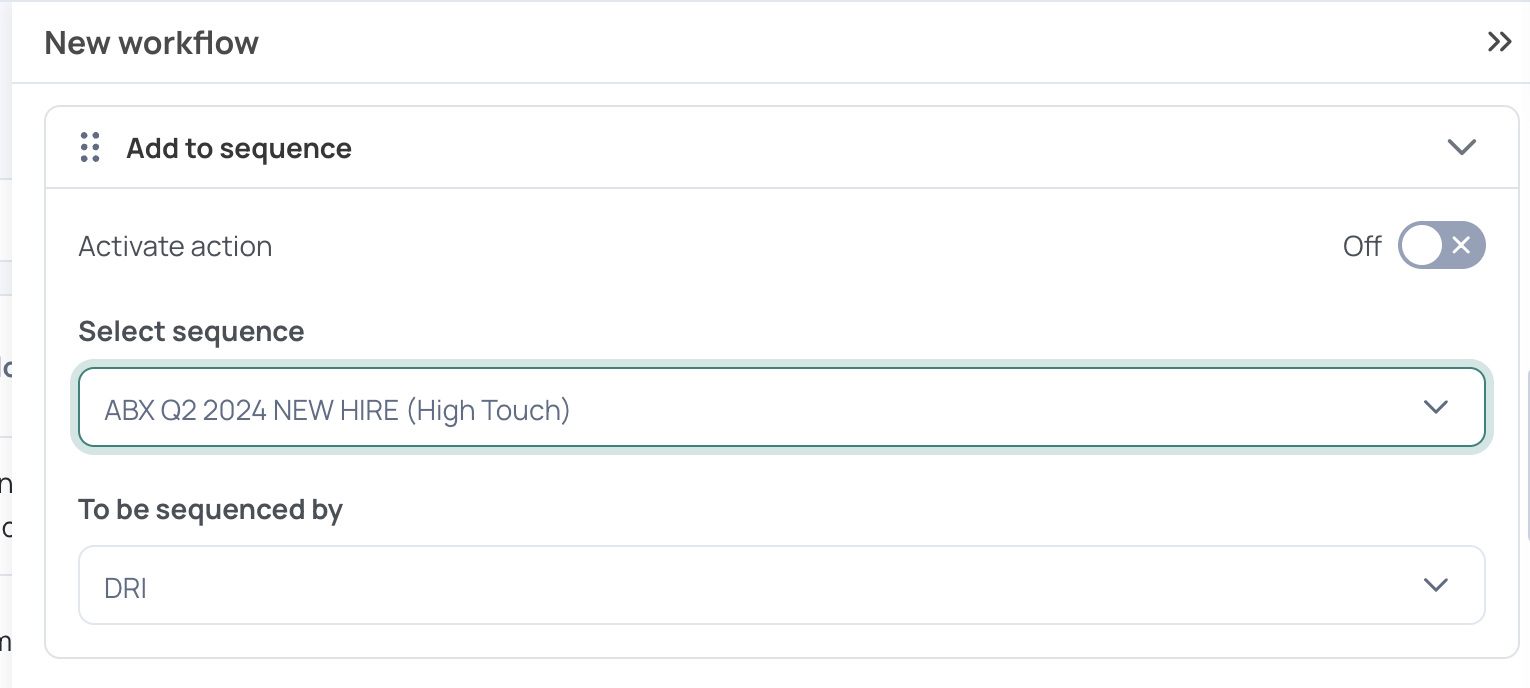
Step 2. Navigate to the Workflows page from the left-hand nav bar and select + Add Workflow.
In the ‘Filter’ tab, click ‘Choose an existing audience’ and select the audience you just built for New Hires at Target Accounts.
Step 3. Move to the ‘Actions’ tab and scroll to the ‘Add to sequence’ section. Select the outbound email sequence to which this audience should be added. Then specify who should sequence it: the DRI, record owner, account owner, or a specific user, for example.
Step 4. Scroll down to the ‘Send email’ and Send Slack message’ sections. Here you can set up an automatic alert for the individual sales rep who needs to know about this sales trigger.
Configure your Slack notification and add a message telling the rep all relevant details so they don’t need to do additional research on the alert.
💡 Pro Tip: Type the dollar sign “$” to include merge field text. This will automatically bring in information like Name, Title, Company, etc.
Step 5. Next, move to the ‘Schedule’ tab. Here, you can choose exactly when you want this workflow to run. Remember to consider any parameters from Outreach or Salesloft that you have set up. For instance, you might only send emails during EST business hours. Make sure your workflow parameters align.
Step 6. The final tab is the ‘Limits’ tab. Here, you can set guardrails so you don’t send too many emails at one time. For this workflow, try sending 2 contacts per month. This will ensure you don’t bombard a single company with too many emails each month.
Click Save and you have yourself an automated workflow!
Workflow #2 - Champion Joins Target Account
Champion tracking is one of the best ways to generate new revenue. New hires and promotions are great sales triggers, but if it’s a past champion at a Closed Won account, even better.
This workflow will help your team capitalize on job changes that involve a past champion.
Create an Audience
Step 1. To set up the audience for this workflow, you’ll want to choose the following options from the audience filters:
- Company Category - Target
- Persona
- Has Email - Yes
- Signal - New Hires
- Contact Relationship - Key Champion, Closed Won Opp Contact
- All Accounts
💡 Pro tip: If you already have an audience saved with your parameters, there’s no need to recreate it for your workflow. Simply select the existing audience from the dropdown!
Now click “Save audience” and name it something you will remember.
Create the Workflow
Step 2. On the Workflows page's ‘Filter’ tab, click ‘Choose an existing audience’ from the dropdown. Validate that your audience filters are set up the way you want them.
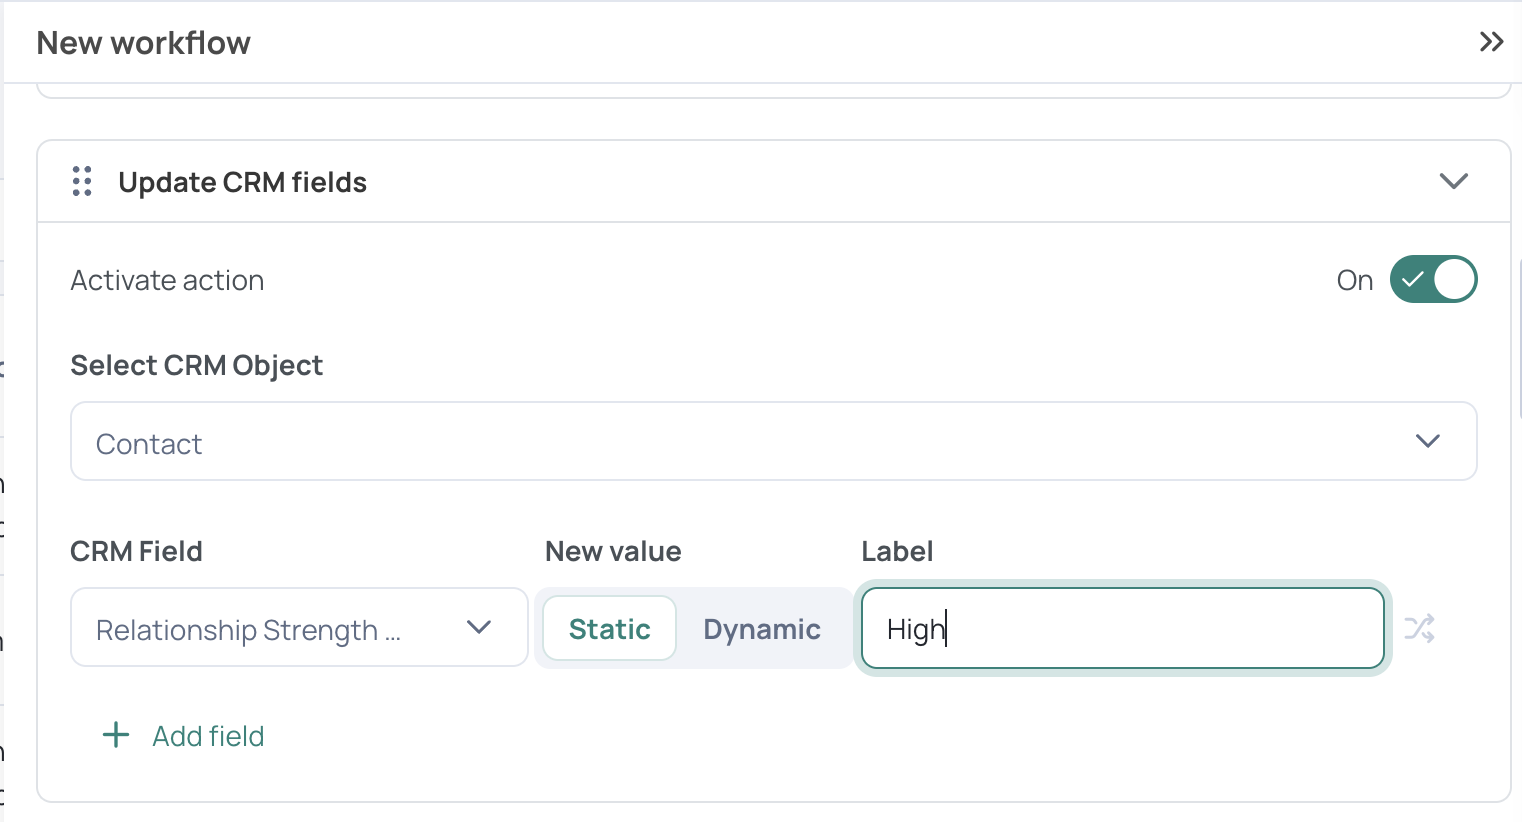
Step 3. Move to the ‘Actions’ tab and scroll to the ‘Update CRM fields’ section. Search for ‘relationship strength’ within the ‘Contact’ CRM object.
In the label text box, type in the status ‘High.’ Now, relationship statuses will automatically be labeled as ‘High’ when a previous champion moves to a target account.
Step 4. Select the outbound email sequence to which this audience should be added. Then, specify who should sequence it: the DRI, record owner, account owner, or a specific user, for example.
Step 5. Next, move to the ‘Schedule’ tab and choose when you want this workflow to run. Choose daily, monthly, or weekly, as well as a specific time of day.
Step 6. Finally, navigate to the ‘Limits’ tab. Because this is an infrequent but very time-sensitive action, don’t put any limits in place. This will ensure that all past champions who join target accounts are added to your outbound sequencing and marked as High priorities in your CRM.
Click Save, and your workflow is complete!
Never miss your number with automatic workflows in UserGems
You’re always looking for ways to save your team time and ensure that no good sales trigger event is slipping through the cracks. That job just got easier with the help of automatic workflows in UserGems.
There are hundreds of ways you can configure your own workflows. Reach out to your CSM if you have questions or would like help setting up your first workflow!
Happy automating!


Join our monthly Dig Deeper session ⛏️


.svg)
